Windows creates memory dump and minidump files when it crashes. These files take up space on your system’s hard drive or SSD, and you can remove System Error Memory Dump to free up space. Here’s how.
Table of Contents
How to System Error Memory Dump on Windows 10
Introduce
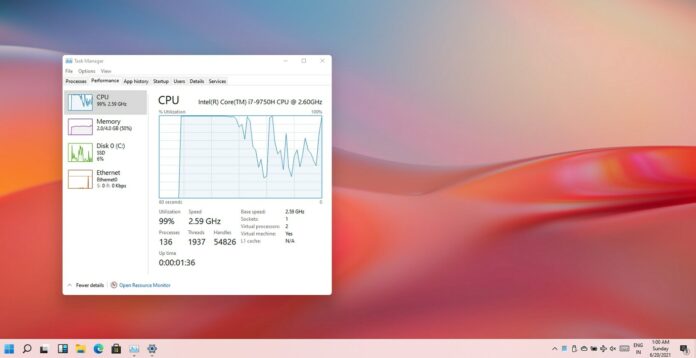
Whenever Windows suffers a Blue Screen of Death (BSOD) error, it generates a crash file or memory dump file containing a lot of information, like the process threads active before the crash, running programs and apps, active drivers, kernel information, and event timestamps.
Windows keeps a maximum of one memory dump file (generally at C:WindowsMEMORY.DMP), which it overwrites every time your system blue-screens. This file can be up to 800MB in size, and it contains a lot of details that might be useful for a programmer or developer who needs to debug the crash.
There are also smaller minidump files, which are memory dump files that contain fewer details. You can generally find these files in C:WindowsMinidump.
Unless you plan on sharing these files with someone or using them yourself to help troubleshoot a system crash or other problem, you can safely delete them to free up space.
Remove Memory Dumps with Windows Settings
You can use the Windows Settings app to get rid of the system error memory dump files.
To open the Windows Settings app, press Windows+i and select the “System” section.

Click the “Storage” option on the left pane.

Click “Temporary Files” in the right pane.

Check the box next to “System error memory dump files” if it isn’t selected by default. You can check the boxes for other options as well to free up more space.

Click the “Remove files” button at the top of the window.

Windows will remove the system error memory dump files from your PC.
-
Read more : how to uninstall Cortana on Windows 10
Wipe the Files with Disk Cleanup
You can also fire up the Disk Cleanup tool. It can remove memory dump files and other system files that the Storage section of the Windows Settings app doesn’t list.
To get started with the Disk Cleanup tool, click Start, type “Disk Cleanup,” and select “Run as administrator” from the right-hand pane. Click “Yes” on the User Account Control prompt.

Select your Windows system drive—that’s generally the “C:” drive—and click “OK.”

Disk Cleanup will calculate the amount of space you can free up by deleting different types of files.
After it does, scroll down to check the boxes for the “System error memory dump files” and “System error minidump files.” You can also choose other system files that you want to remove. Then, click “OK.”

The Disk Cleanup tool will remove all of the chosen files from your PC.
Delete the Files in Command Prompt
If you’re comfortable using the Command Prompt, you can quickly enter a command to delete the memory dump file.
Press Windows+R to open the “Run” box, type “cmd” in the box, and press Ctrl+Shift+Enter to open the Command Prompt with administrator privileges.

Type (or copy and paste) the following command and press Enter:

You’ll see a “Deleted file” confirmation line in the Command Prompt.
To delete the minidump files, type (or paste) the following command and press Enter:

Now, you don’t have memory dump files taking up disk space—not until Windows blue-screens again, anyway.