Do you want a great way to share your Microsoft PowerPoint slideshow on social media, your company intranet, or a blog? You know how to Create an Animated GIF of PowerPoint presentation and share it with the world.
Table of Contents
Create an Animated GIF of PowerPoint Office 365
Overview
If you have PowerPoint for Microsoft Office 365 on Windows or Mac, creating an animated GIF is a piece of cake. Since the steps differ slightly, we’ll list them separately so that you can jump right to the platform you need.

Create an Animated GIF in PowerPoint on Windows
Open your PowerPoint slideshow on your Windows computer and click File > Export.

Under Export, choose “Create an Animated GIF.”

To the right, select the quality in the drop-down list at the top. It’s set to medium by default, but you can choose small, large, or extra large if you like.

Optionally, you can check the box for “Make Background Transparent.”
By default, the Seconds to Spend on Each Slide is set to one second. This refers to a minimum number of seconds per slide. If you have animations that are longer than the minimum, they will be included. Transitions between slides do not count toward this minimum. You can use the arrows to increase the number of seconds or enter a number in the box.
You can include all slides in your presentation, or a certain range of Slides, using the arrows or the number boxes.

With everything set, click “Create GIF.” You should now be able to see your new presentation GIF in the location you chose.

-
Read more : how to restore powerpoint files
How to Create an Animated GIF of PowerPoint for MacOS
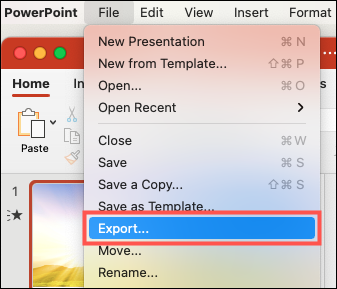
Open your presentation in PowerPoint for Mac and click File > Export from the menu bar.
In the Export window, choose a location in which to save the file. You can rename it if you like, and optionally, add tags. If you want to save it online, click “Online Locations” and pick your Place.

In the File Format drop-down list, select “Animated GIF.”

The Image Quality is set to medium by default, but you can pick small, large, or extra large if you prefer. If you want a transparent background, check that box next to Background.

Another default setting is the Seconds Spent on Each Slide, which is one second. Like on Windows, this refers to a minimum duration spent on each slide, in which animations are included, and transitions don’t count toward the minimum. You can adjust this by using the arrows or by entering a number of seconds in that box.
You can use all slides in your presentation, or a specific range of Slides, using the arrows or the number boxes.

When you’re ready, click “Export.” Then, head to the location where you saved the file and grab your GIF.

Notes on Your Animated GIF
Here are just a few things to keep in mind for your animated GIF. You can finish create an animated GIF of PowerPoint now.
Hopefully, this handy Microsoft PowerPoint tip helps you share your presentation quickly and easily wherever you like. You can also save a slide as an image if you’d like to give that a try !